|
|
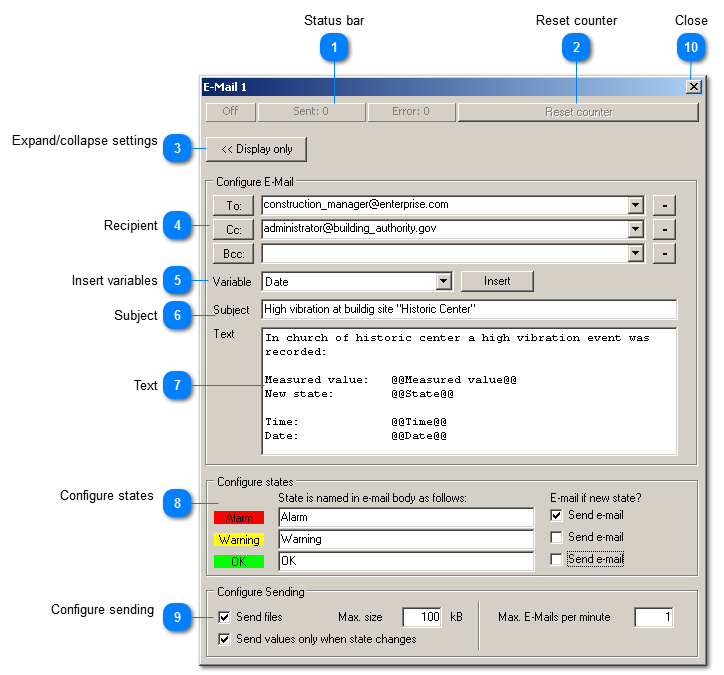
Configuration of an E-Mail annunciator
You can create up to 100 E-Mail annunciators in VibroMetra and enter recipients and texts individually for each annunciator.
 Status bar
The status bar indicates
-
whether the annunciator is switched on or not, -
how many e-mails have been sent by the annunciator, -
how many errors occurred.
| |
 Reset counter
This button zeros the counters for the sent e-mails and the errors in the status bar. | |
 Expand/collapse settings
After having finished the configuration of the e-mail annunciator, you can collapse the setting area to save space on the screen. For configuration, you can expand the setting area again.
Collapsed state:
| |
 Recipient
In this area, you can enter the recipients for the e-mails.
-
In line To: you enter the main recipients. -
In line Cc: you enter recipients who are to receive a copy of the e-mail and whose e-mail address is to visible for all recipients. -
In line Bcc: you enter recipients who are to receive a copy of the e-mail and whose e-mail address is to be invisible for all recipients.
-
You can enter several addresses in each line. Therefore, you confirm the address by pressing the Enter button and enter the next address. By means of the  button you can expand the list and enter addresses. -
If you want to delete an address, expand the list by means of the button and select the address you want to delete. Confirm by clicking on  . -
The buttons    open the address book of the e-mail software. But only few e-mail programs support this function (e.g. Outlook 2000), so that clicking on these buttons mostly does not have any effect.
| |
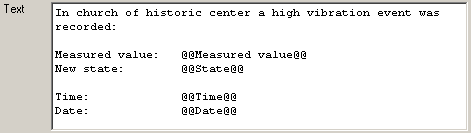
 Insert variables
In subject line and text of the e-mail, you can insert variables which are filled with current values at time when the e-mail is sent. 4 variables are available:
-
Measured value: The currently measured value is inserted. -
State: The current state is inserted. -
Date: The current date is inserted. -
Time: The current time is inserted.
By clicking on Insert, you insert the variable in the subject or text of e-mail at the place of the cursor. The placeholder for the variable is simple text which is specially marked (with @@)
| |
 Subject
You can configure the subject line of the e-mail in this field. This subject can contain simple text but also variables. | |
 Text
You can configure the text of the e-mail in this field. You can enter simple text but also variables. | |
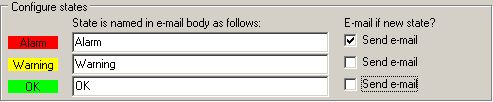
 Configure states
You can change the state names here. For instance, a limit exceedance could be named "exceedance of guide values" instead of "alarm". Furthermore, you can select for which states e-mails are to be sent.
| |
 Configure sending
You can set different limits for e-mail sending so the recipient will not receive too many e-mails.
-
For instance you can decide that attached files will only be sent if they do not exceed a certain size. -
Up to 16 measured values can be ready for sending per second. It is advisable to send measured values only in case of state changes. -
Finally, you can restrict e-mail sending globally by a maximum number of e-mails per minute. If the connected instrument generates more e-mails per minute. these e-mails are blocked until the minute is over. E-mail which have not been sent are counted as errors in the status bar.
| |
 Close
 This button closes the window. But it can be opened again, for instance by a double click in the selection tree. Only deleting the annunciator will erase it permanently. | |
|
|